Who Was The Grand Old Duke of York?
- Jul 23, 2025
- 5 min read
The Grand Old Duke of York is one of Britain's most enduring and recognisable nursery rhymes. While seemingly a simple children's song, its cheerful melody and marching rhythm carry echoes of historical events, and offer a neat entry point into understanding basic musical structures and cultural memory.
The "Duke" in question is most commonly believed to be Prince Frederick, Duke of York and Albany (1763–1827), the second son of King George III. He was a military commander who, during the French Revolutionary Wars, led British and Allied forces in Flanders and the Netherlands. His campaigns, particularly the Flanders Campaign (1793-1795) and the Helder Campaign (1799), were marked by mixed success, including some notable strategic retreats.
The rhyme's lines – "He had ten thousand men / He marched them up to the top of the hill / And he marched them down again" – are often interpreted as a humorous, perhaps satirical, commentary on military maneuvers that achieved little decisive outcome, or on the perceived futility of some of Frederick's campaigns. Hills, of course, are strategically important in warfare, and marching men up and down them without clear victory could easily become a subject of popular jest. While its exact origin date is debated, it likely gained popularity in the early to mid-19th century, reflecting contemporary attitudes towards the Duke's military career.
Questions on The Grand Old Duke?
Question 1: Who is the "Duke" most commonly believed to be in the rhyme?
Question 2: Who is the "Duke" most commonly believed to be in the rhyme?
Question 3: Name one of the specific campaigns led by Frederick, Duke of York.
Question 4: What characteristic of the rhyme's melody and rhythm is mentioned?
Question 5: How are the rhyme's lines about marching men often interpreted?
Question 6: Why are "hills" mentioned as being strategically important in warfare?
Question 7: When did the rhyme likely gain popularity?
Question 8: What did the rhyme's popularity reflect regarding the Duke's military career?
Develop the Skills for The Grand Old Duke of York
Can you find this section in the music?
It is in bars & plus bars &

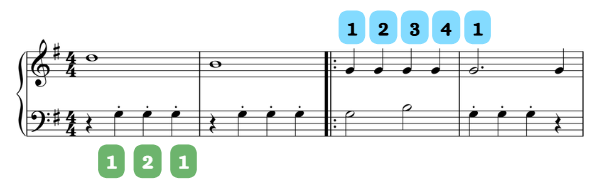
For piano players, focusing on efficient fingering:
B4 (Image: Finger 3): Start with the third (middle) finger on B3
G4 (Image: Finger 1): The first (thumb) finger is then lined up to play G4.
A4 (Image: Finger 4): The fourth (ring) finger is lifted and moves down one note to play A4 while the second (pointer) finger rises and moves towards the F sharp.
F#4 (Image: Finger 2): Continue the movement and play the F sharp with the second (pointer) finger while the first (thumb) finger remains on G4.
G4 (Image: Finger 1): As the first (thumb) finger plays the G4 the hand moves back over the thumb to prepare for the next note.
Understanding Finger Choices Beyond the Numbers
When you see numbers above or below notes, these are fingering suggestions – guides for which finger to use on each key. While they offer a starting point, the most effective fingering for any passage is ultimately the one that feels most comfortable and efficient for your hand, helping you produce the best musical result.
One crucial technique often employed in piano playing is finger swapping (or finger substitution). This involves silently changing fingers on a sustained note, or using a different finger on a repeated note or a note that appears again shortly. Why do we do this?
For a Cleaner, Smoother Sound (Legato): Swapping fingers allows you to maintain a continuous, connected sound (legato) without lifting your hand off the key. Instead of re-striking a note with the same finger (which can sometimes create a slight break in the sound or a percussive "hammering" effect), another finger takes over seamlessly. This is especially important for sustained notes or repeated notes where you want a smooth flow.
To Prepare for Future Notes: A well-chosen finger swap can position your hand more comfortably for the notes that follow, eliminating awkward stretches or jumps and enabling a smoother line.
To Facilitate Phrasing: Sometimes, a finger change helps articulate a musical phrase more clearly, allowing for subtle dynamic shifts or a more natural flow within a melodic line.
The systematic use of all fingers, including the thumb, and the practice of finger substitution began to gain prominence in keyboard playing during the Baroque era, particularly with composers and pedagogues like François Couperin and Carl Philipp Emanuel Bach. They moved away from older, more restrictive methods to advocate for a more versatile and efficient use of the hand, paving the way for modern piano technique.
Remember, the fingerings you see are suggestions. Feel free to experiment! While sometimes repeating a digit (like "hammering" a key) might work for certain effects or very quick repetitions, usually swapping fingers produces a cleaner, more connected, and less effortful sound, allowing your music to truly sing.
Find what numerical sequence is best for your hand, always listening carefully to the sound you produce.
The History of 1st & 2nd Time Bars (Volta Brackets)

1st and 2nd time bars, also known as "volta brackets" (from the Italian volta, meaning "time" or "turn"), emerged from the need for efficiency in music notation. Early scores often required composers to rewrite entire sections of music if they were to be repeated, even if only the ending differed. As compositions became longer and music printing more common, notation shortcuts became essential to save space and improve readability.
The systematic use of volta brackets became standardised during the Renaissance and Baroque periods (roughly 16th-18th centuries). These symbols work in conjunction with repeat signs, allowing composers to provide different endings for a repeated section of music without having to write out the entire passage twice.
1st Ending (Prima Volta): This section is played only the first time the music is performed. After playing these notes, the musician returns to the beginning of the repeated section.
2nd Ending (Seconda Volta): On the second time through the repeated section, the musician skips over the 1st ending & jumps directly to the notes under the '2' bracket, continuing the piece from there.